TOGAF® ADM Tool for Enterprise Architecture
Compatible Visual Paradigm Edition(s): Enterprise Only
Enterprise Architecture is essential to every business, yet it’s not easy to master. Have you ever thought that you would be able to learn Enterprise Architecture if only you had a tutor on whom you could call whenever you wanted? Visual Paradigm is here to help. Equipped with an intuitive ADM process navigator, to develop Enterprise Architecture with Visual Paradigm is just like having a tutor sitting next to you, guiding you through the instructions, talking you through the samples. All you need to do is to follow the on-screen instructions, fill-in some forms, draw some ArchiMate diagrams (3.0), and that’s it, the deliverables will be there for retrieval.
Visual Paradigm makes you an enterprise architect in no time at all – and with no training, as the actionable guide through process come along with instructions, tips, samples and case study. Read through this tutorial, relax and see how you can use Visual Paradigm to produce deliverables from TOGAF® ADM with ease.
What is TOGAF® ADM?
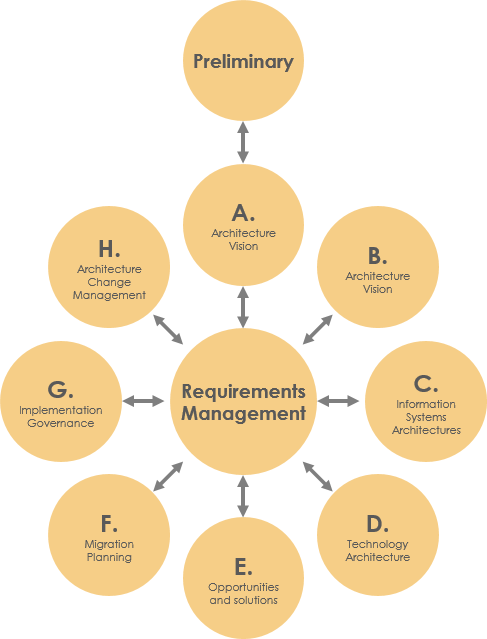
TOGAF® is the short form of The Open Group Architecture Framework. TOGAF® provides detailed method and a set of supporting tools for developing an enterprise architecture. TOGAF® ADM, short for TOGAF® Architecture Development Method, is an architecture method suggested by TOGAF®. It is a method for developing and managing the lifecycle of an enterprise architecture, and forms the core of TOGAF®. When we talk about TOGAF® ADM or simply ADM, we refer to the ADM cycle below:
What does Visual Paradigm Offer?
TOGAF® ADM is the process to developing an enterprise architecture, while Visual Paradigm features a process navigator that guides you through the execution and completion of TOGAF® ADM. Broadly speaking, Visual Paradigm features/facilitates the following:
- An ADM process navigator that guides you through the development of enterprise architecture with TOGAF® ADM, activity by activity, step by step
- Guide you through the creation of deliverables and artifacts, with clear instructions
- Generate deliverables upon the completion of a ADM phase
- Automatic archiving of deliverables in an Architecture Repository
- Helps you understand TOGAF® by providing you with samples
- Provides the tools and diagrams you need in analysis and documentation, which includes ArchiMate 3.0 diagrams, ArchiMate 3.0 viewpoints, Implementation Plan Diagram, Migration Roadmap, Maturity Analysis, PERT Chart, RACI Chart, Implementation Factor Assessment & Deduction Matrix, Consolidated Gaps, Solutions, & Dependencies Matrix, etc.
Preparation
You need a project to work on. To avoid messing up your production data, create a new project in Visual Paradigm first. You can create a new project by selecting Project > New from the application toolbar.
Get Started!
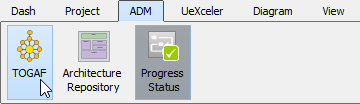
You can access the ADM process navigator anytime throughout the ADM cycle by selecting ADM > TOGAF® from the application toolbar.
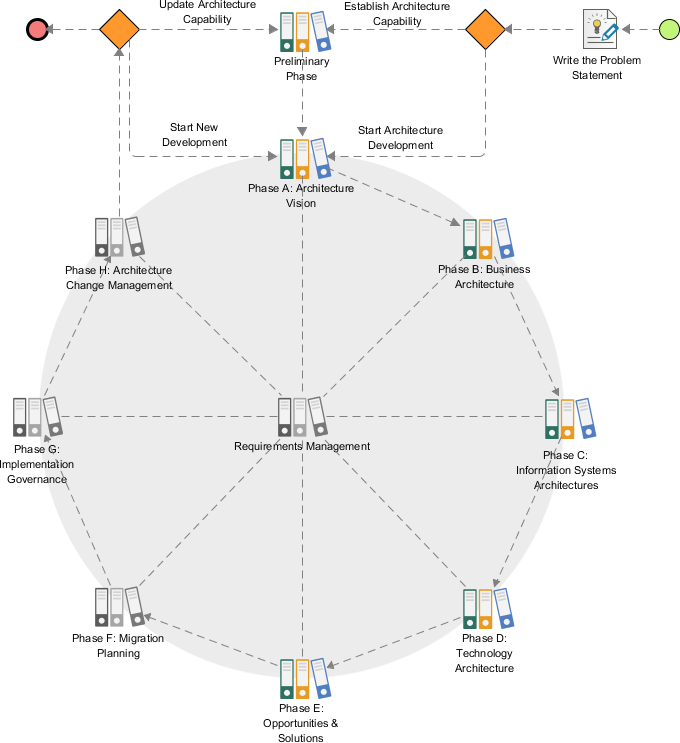
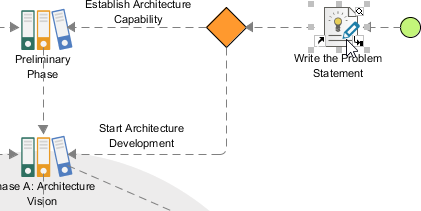
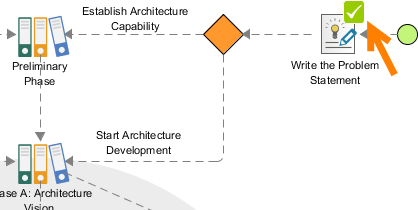
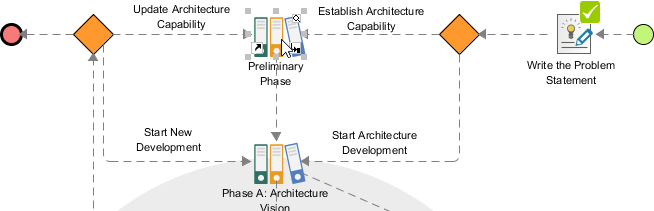
 You should see the screen below. The green circle on the left indicates the start of the ADM cycle, while the red circle on the right indicates the end. The connectors and shapes between the start and end form the flow of the cycle.
Writing the problem statement
Let’s walk through the process.
- Double click on the activity Write the Problem Statement to open it.
You can see the screen below.
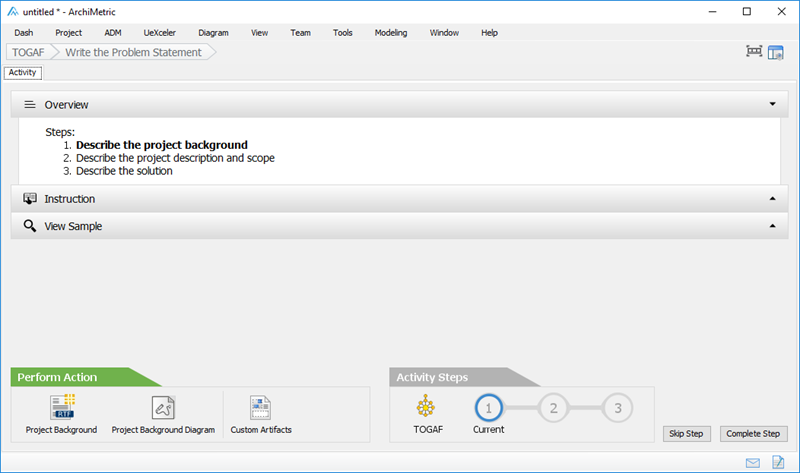
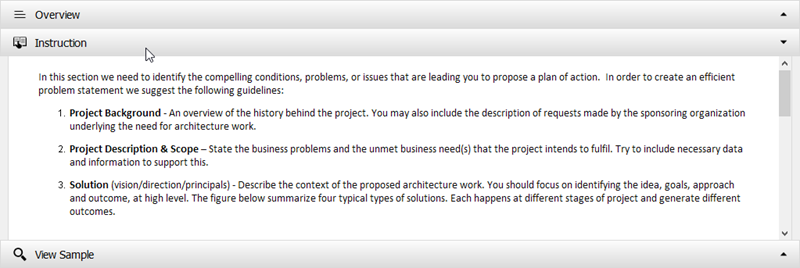
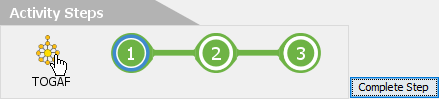
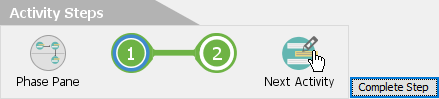
This is the screen that guides you through the execution of steps under different ADM phases. Take this case as example, to write a problem statement you need to complete three steps (as listed in the Overview section). The action(s) required are placed as action items at the bottom left. Here is a description of the various parts of this screen:Part Description Overview The steps required to complete under this activity. The step in bold indicates the current step that you need to perform at this moment. Once you’ve completed a step, click on Complete Step at bottom right to proceed to the next step. Instruction Click to expand the Instruction pane, which shows the information you need to know about the step, what you need to do, what is the purpose, and what will achieve. View Sample Click to expand the View Sample pane, which displays sample(s) associated with this step. Let’s say if the step requires you to draw a specific type of diagram that you are not familiar with, you can view the sample to gain ideas about how the diagram should look like. Perform Action The action you need to take to complete this step. There may be one action or more. And if you want to insert your own text or diagrams in addition to what we recommend, you can click the Custom Artifacts button to add it manually. In this case, you are asked to write a project background and draw a diagram to depict the project background. These are the actions to take in step 1. In step 2 there will be another set of actions required. Activity Steps Indicates the progress and completeness of this activity. - Let’s take a look at the instruction. Click on Instruction to expand it. You can see a detailed description of this activity and/or step, with guides that guides you through the completion of this step.
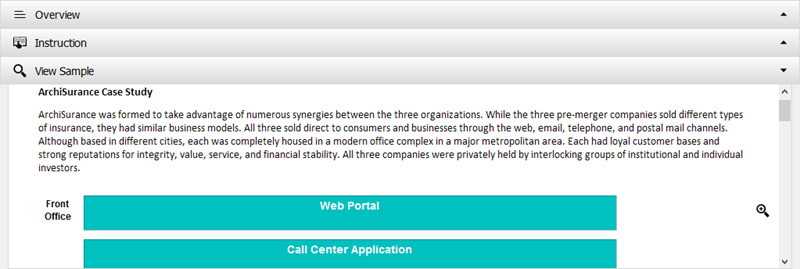
- Let’s check the sample. Click on View Sample to expand it. You can see a description of project background and images that illustrate the current and expected states of an organization (for this case). In this step you are expected to create something alike.
- Let’s perform the action required to complete this step. Click on Project Background at the bottom right.
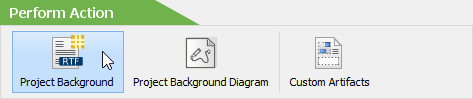
- You are prompted to enter the project background. To make this tutorial simpler let’s follow the sample data provided under the View Sample section first. Copy and paste the following content to the text box and click OK to confirm.
ArchiSurance was formed to take advantage of numerous synergies between the three organizations. While the three pre-merger companies sold different types of insurance, they had similar business models. All three sold direct to consumers and businesses through the web, email, telephone, and postal mail channels. Although based in different cities, each was completely housed in a modern office complex in a major metropolitan area. Each had loyal customer bases and strong reputations for integrity, value, service, and financial stability. All three companies were privately held by interlocking groups of institutional and individual investors. 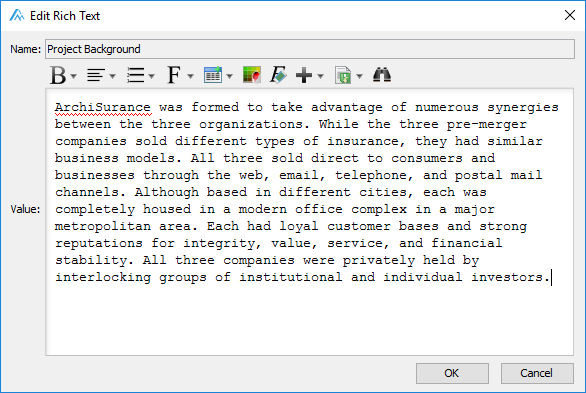
- You may optionally draw a diagram to illustrate the project background but we are not going to cover it in this tutorial. So we’ve completed this step. Click on Complete Step at bottom right.

- You are brought to step 2. Now, click on the action icon Project Description & Scope at bottom left.
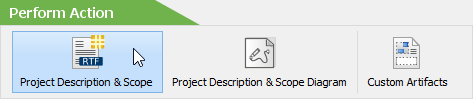
- You are prompted to enter the project description and scope. Again, copy and paste the text below to Visual Paradigm. And then click OK.
The lead investors of the three companies began merger talks after they noticed that lower-cost competitors were entering their markets, that there were new opportunities in high-growth regions, and that each company required significant new IT investments to remain competitive. They realized that only a larger, combined company could simultaneously control its costs, maintain its customer satisfaction, invest in new technology, and take advantage of emerging markets with high growth potential. The merger negotiations and regulatory approvals took 18 months, but two years ago the papers were signed and the merger was complete. The new company offers all the insurance products of the three pre-merger companies, and intends to frequently adjust its offerings in response to changing market conditions. Like its three predecessors, ArchiSurance sells directly to customers via web, email, telephone, and postal mail channels, and indirectly via intermediaries. - Click Complete Step at bottom right.
- You are brought to step 3, which requires entering the solution to the problem. Similarly, click on the action icon Solution in the Perform Action section, and then copy and paste the text below to Visual Paradigm.
The inflexibility of the ArchiSurance application architecture makes it difficult to adapt to changes in business conditions. Partly as a result of the merger, the application landscape has become scattered, resulting in data redundancy and functional overlap, as well as point-to-point application integration using a variety of data formats and methods. These problems cause internal instabilities, increased application maintenance costs, and obstacles to sharing information across the company and with partners. Consequently, the IT department has a sizable backlog of work requests. ArchiSurance top management is very concerned about the backlog, particularly an unmet need to share information automatically with high-volume contracted sales partners and influential insurance consultants. The ArchiSurance lead investors and CEO support these initiatives on the condition that all changes are invisible to ArchiSurance customers and partners. The insurer’s products and services must not be affected, and all customer and partner interactions must proceed uninterrupted and unchanged. As part of this effort, the technical infrastructure will also be simplified. The separate back-office servers will be replaced by a shared server cluster located in the data center at Home & Away headquarters. However, to ensure business continuity, there will also be a back-up server cluster located in the data center at PRO-FIT headquarters.
- Click Complete Step at bottom right.
- We have completed all the steps required. Let’s go back to the TOGAF® ADM process navigator. Under the Activity Steps section, click on the button TOGAF®.
You can see a check mark next to the activity Write the Problem Statement, indicating its completion.
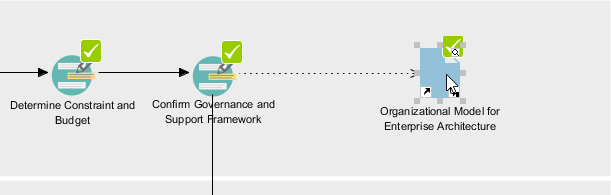
Preliminary Phase – Developing ‘Organizational Model for EA’
We’ve finished writing the problem statement, let’s proceed to the first phase of ADM, the Preliminary phase.
- Double click on the activity Preliminary Phase to open it.
This time you are brought to a process diagram that shows the activities involved in the preliminary phase.
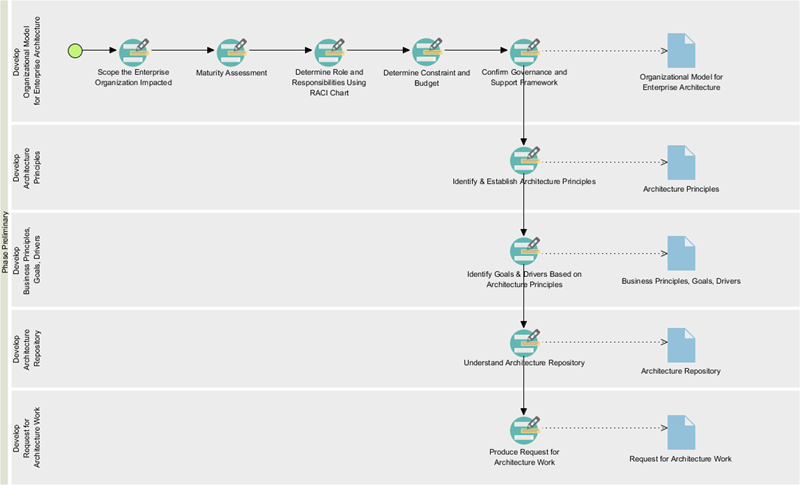
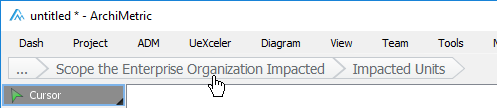
This time you are brought to a process diagram that shows the activities involved in the preliminary phase. - Let’s start from the first activity – Scope the Enterprise Organization Impacted. Double click to open it.

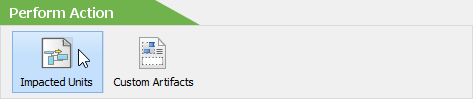
- The first step requires you to draw an ArchiMate diagram to represents the organization units being impacted by the architecture development initiatives. Take a quick look at the instruction and sample. Then, click on Impacted Units under the Perform Action section.
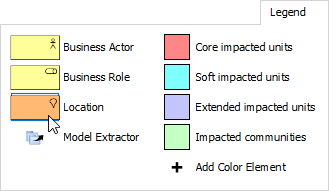
- This time you are presented a new, empty ArchiMate diagram. You have to use the legend at the bottom right of the diagram to draw the diagram that shows the impacted units. Let’s draw a Location first. Select Location in the legend.
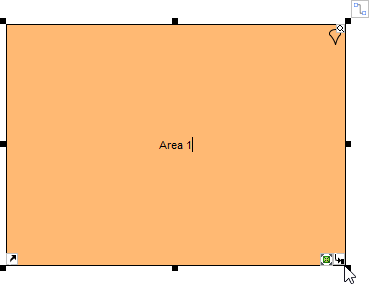
- Draw a Location in the diagram and name it Area 1.
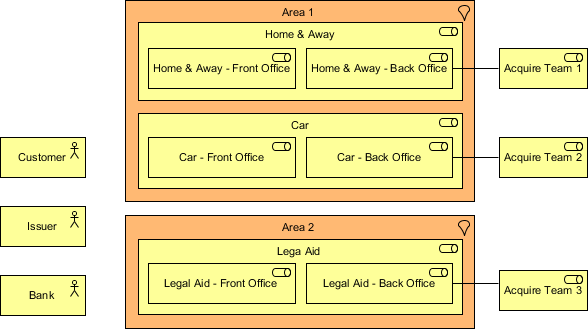
- Apply the same technique to draw a diagram that looks like this:
- According to the instruction, we need also to indicate the level of impact of individual units. Let’s indicate the units with Core impact first. To do this, click on Core impacted units in legend and click once on the unit with core impact.
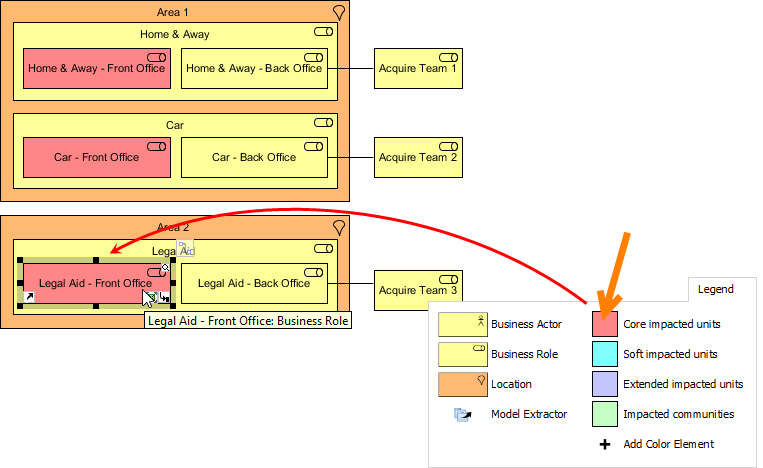
- Indicate the level of impacts on other units. The completed diagram should look like this:
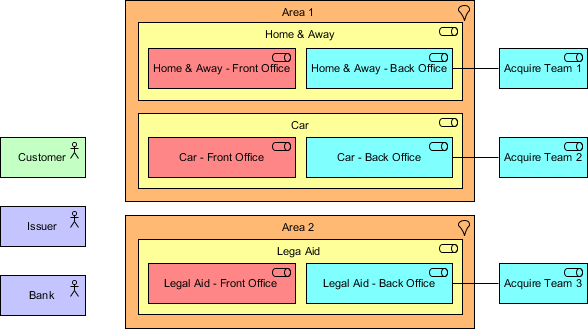
- We’ve finished drawing this diagram. Let’s go back to the activity page by clicking on the breadcrumb.
- Click Complete Step at bottom right.
- Step 2 requires describing the impacts in detail. Click on the action item Description of Impacts under the Perform Action section. Then, complete the table with the sample content below:
Unit Level of Impact Description Car – Front Office Core impacted units ArchiSurance is going to provide a one-stop shop solution for its customers by unifying the three front offices into one single point of contact for all three major type of products and services. Home & Away – Front Office Core impacted units N/A Legal Aid – Front Office Core impacted units N/A Acquire Team 1 Soft impacted units N/A Acquire Team 2 Soft impacted units N/A Acquire Team 3 Soft impacted units N/A Car – Back Office Soft impacted units Front offices will redirect all the inquiries and distribute information to each back ends office, while daily operations will remain the same. Home & Away – Back Office Soft impacted units N/A Legal Aid – Back Office Soft impacted unit N/A Bank Extended impacted units N/A Issuer Extended impacted units While the three back end officers will unify into one contract point the informational exchange between the issuer and the offices will be done through existing channels. Customer Impacted communities To inquiry any information regarding the three services customers can contact the front office as the contract point. - Go back to the activity page through the breadcrumb.
- Click Complete Step at bottom right.
- Let’s move on to the next activity. Under the Activity Steps section, click on Next Activity.
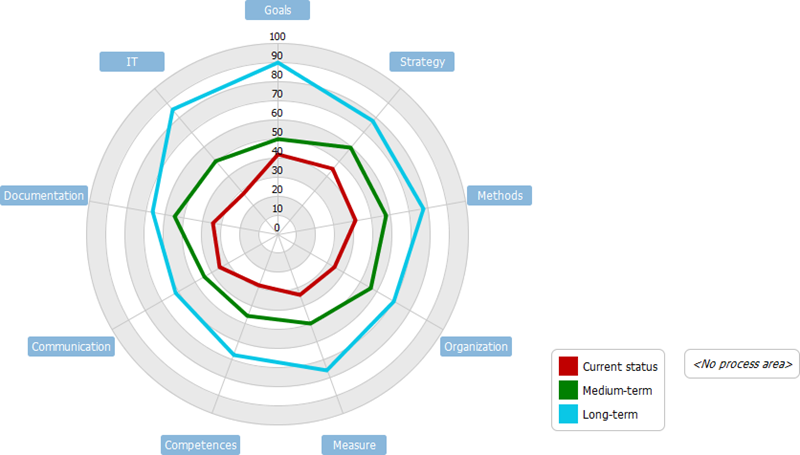
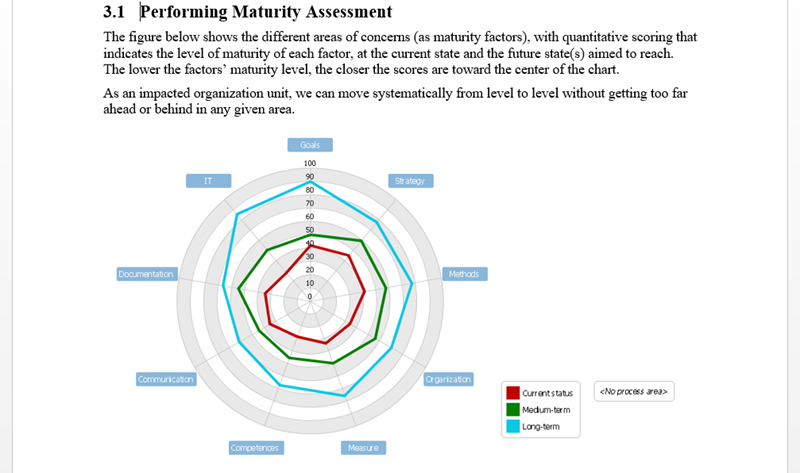
- This activity requires you to perform a maturity analysis. Apply the techniques you learned so far to draw the chart below for step 1. You can rename a maturity factor (i.e. Goal, Organization, Strategy) by double clicking on it and entering a new name, and add a new factor by right clicking on the chart and selecting Add Maturity Factor from the popup menu.
- Go back to the activity page through the breadcrumb.
- Click Complete Step at bottom right.
- Steps two requires reviewing the maturity gaps. Click on the action Gaps Table, take a look and go back to the activity page.
- Click Complete Step at bottom right. So you should now have a basic idea about how to use Visual Paradigm to develop enterprise architecture. We will just stop here.
Generating a Deliverable
Once you’ve completed all the activities in a (deliverable) lane, you can generate the deliverable. To generate a deliverable is simple, you just need to double click on the document shape on the right hand side of the lane.
 Then, provide a file name and confirm. A document is generated with the information entered presented.
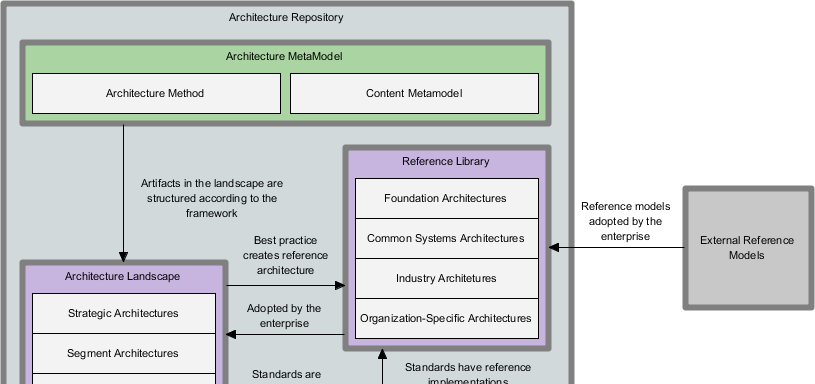
Using the Architecture Repository
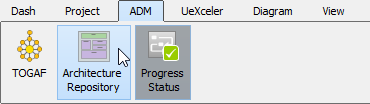
The Architecture Repository is a holding area for all architectural assets within an enterprise. Every time when you generate a deliverable, a copy will be archived automatically in the Architecture Repository. To open Architecture Repository, select ADM > Architecture Repository from the application toolbar.
 You can then access the deliverables in the drawer named Organization-Specific Architectures. Double click to open it.
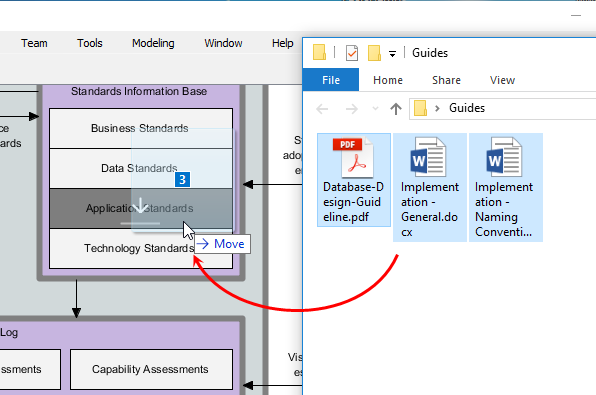
 The Architecture Repository also allows you to store and manage your own files. To do this, simply drag the files need to store into Architecture Repository and drop under the target drawer.