


Beginner’s Journey with Step-by-Step Tutorials, Real Case Study & Pro Tips

“I had never drawn a UML diagram before. I didn’t know what a ‘class’ or ‘sequence’ meant. But I needed to document a small project for my computer science course. Here’s how I went from complete beginner to confidently modeling my first system—using only free tools.”

🗺️ Part 1: My User Experience Journey — From Confused to Confident
🌱 Day 1: “What Even Is UML?”
I started with zero knowledge. A quick Google search led me to Visual Paradigm’s free tools. Two options appeared:
-
Community Edition (Desktop): “Professional modeling software”
-
VP Online: “Free online diagramming tool”
I chose VP Online first because… well, no download required. 😅
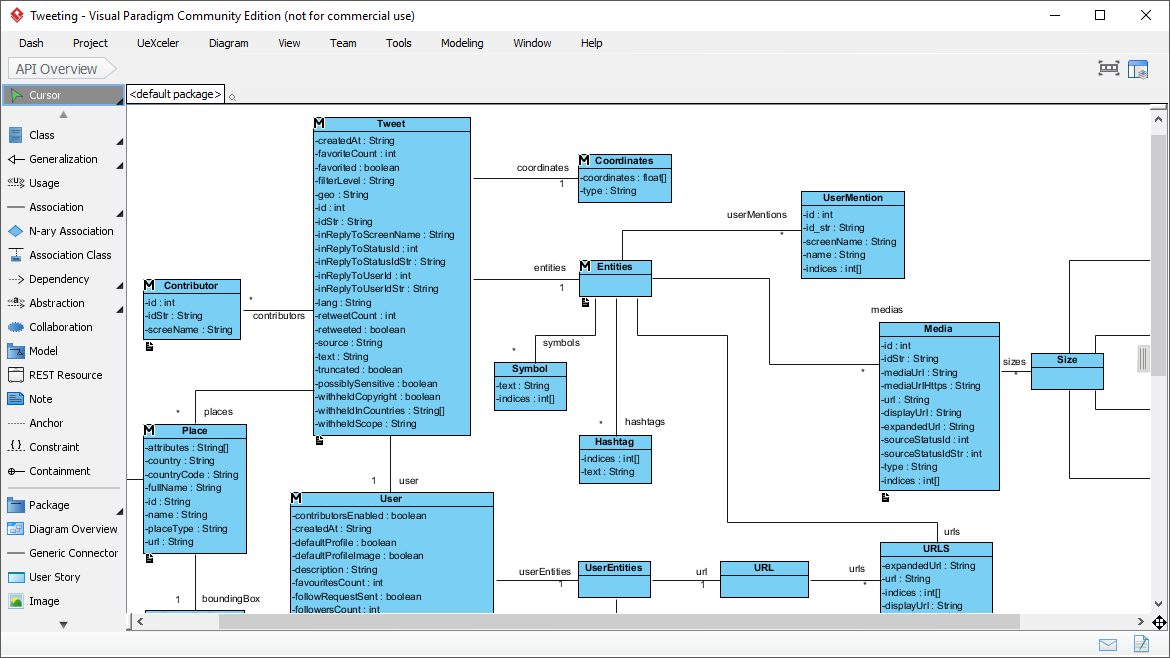
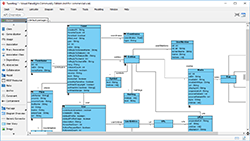
First impression: The interface was surprisingly clean. No overwhelming menus. I clicked “Create New Diagram” → “Class Diagram” and… a blank canvas appeared.
🎨 Day 2: “Wait, How Do I Actually Draw This?”
I dragged a “Class” shape onto the canvas. It had three sections:
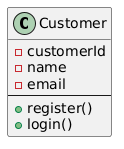
💡 Aha moment: I realized UML classes aren’t just boxes—they’re structured templates for organizing system information.
🔗 Day 3: “Connecting the Dots”
I added a second class: Order. Then I used the connector tool to draw a line between Customer and Order.
The tool automatically suggested relationship types:
-
Association (simple link)
-
Aggregation (“has-a” relationship)
-
Composition (“owns-a” relationship)
-
Inheritance (“is-a” relationship)
I selected Association and labeled it “places”. Suddenly, my diagram communicated: “A Customer places an Order.”
🚀 Day 5: “Leveling Up with Desktop”
My project grew more complex. I needed:
-
Multiple diagrams referencing the same
Customerclass -
Syntax validation to catch errors
-
Code generation for my Java prototype
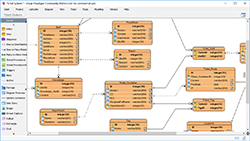
That’s when I downloaded Community Edition (Desktop).
Mind-blowing discovery: When I changed the Customer class name in the Model Explorer, it updated automatically in every diagram where it appeared. This was “true modeling”—not just drawing.
🎓 Day 14: “I Actually Understand This Now”
By combining both tools:
-
VP Online for quick brainstorming with classmates
-
Desktop for formal documentation and code generation
I delivered my project with professional-grade diagrams—and actually understood the system I was building.
✨ Key takeaway: You don’t need to be an expert to start. Visual Paradigm’s free tools meet you where you are.
📘 Part 2: Absolute Beginner’s Guide — No Prior Knowledge Required
❓ What Is UML? (In Plain English)
UML = Unified Modeling Language
Think of it as a visual language for describing software systems—like architectural blueprints for buildings, but for code.
🎯 Why use UML?
-
Communicate ideas clearly with teammates
-
Plan system structure before writing code
-
Document existing systems for maintenance
-
Learn software design patterns visually
🔑 5 Core UML Concepts Every Beginner Should Know
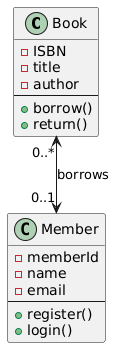
1️⃣ Class Diagram — The “What” of Your System
Purpose: Show the static structure—classes, attributes, methods, and relationships.
Beginner Example: Library System
@startuml
class Book {
– ISBN
– title
– author
—
+ borrow()
+ return()
}
class Member {
– memberId
– name
– email
—
+ register()
+ login()
}
Book “0..*” <–> “0..1” Member : borrows
@enduml
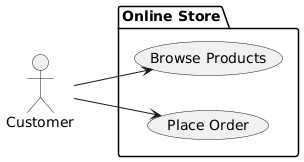
2️⃣ Use Case Diagram — The “Who Does What”

Purpose: Show actors (users) and their interactions with system functions.
Beginner Example:
@startuml
left to right direction
actor “Customer” as c
package “Online Store” {
usecase “Browse Products” as UC1
usecase “Place Order” as UC2
}
c –> UC1
c –> UC2
@enduml
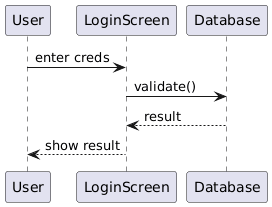
Purpose: Show how objects interact over time to complete a task.
Beginner Example: User Login Flow
@startuml
User -> LoginScreen : enter creds
LoginScreen -> Database : validate()
Database –> LoginScreen : result
LoginScreen –> User : show result
@enduml │
4️⃣ Activity Diagram — The “Step-by-Step Process”
Purpose: Visualize workflows, like a flowchart for business logic.
Beginner Example: Order Processing
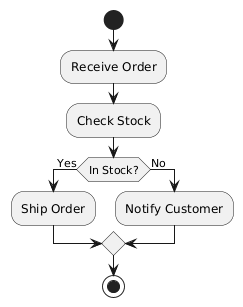
@startuml
start
:Receive Order;
:Check Stock;
if (In Stock?) then (Yes)
:Ship Order;
else (No)
:Notify Customer;
endif
stop
@enduml
5️⃣ Entity Relationship Diagram (ERD) — The “Data Structure”
Purpose: Design database tables and their relationships.
Beginner Example:
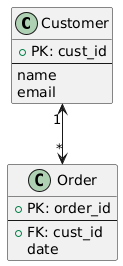
@startuml
class Customer {
+ PK: cust_id
—
name
email
}
class Order {
+ PK: order_id
—
+ FK: cust_id
date
}
Customer “1” <–> “*” Order
@enduml
🧭 Desktop vs. Online: Which Should You Start With?
| If you… | Start with… | Why |
|---|---|---|
| 🎓 Are a student learning UML basics | VP Online | Zero setup, instant feedback, gentle learning curve |
| 💻 Need to generate code or reverse-engineer | Desktop Community | Model-driven architecture enables engineering features |
| 👥 Collaborate with remote teammates | VP Online | Real-time editing, Google Drive sync, shareable links |
| 🗂️ Manage complex, multi-diagram projects | Desktop Community | Model Explorer keeps everything organized and consistent |
| 🎨 Just need a quick visual for a presentation | VP Online | Drag, drop, export in minutes |
| 🔍 Require syntax validation & UML compliance | Desktop Community | Real-time checking ensures professional-quality models |
💡 Pro Tip for Beginners: Start with VP Online to learn diagram types. When you’re ready for deeper modeling, graduate to Desktop Community Edition.
🛠️ Part 3: Step-by-Step Tutorials with Key Concepts & Examples
🌐 Tutorial A: Create Your First Class Diagram in VP Online (5 Minutes)
Goal: Model a simple “Task Manager” app with User and Task classes.
Step 1: Open VP Online
-
Click “Create New Diagram”
-
Select “Class Diagram” → Click “Create”
Step 2: Add Your First Class
-
In the Resource Catalog (left panel), find “Class”
-
Drag it onto the canvas
-
Click the three sections to edit:
-
Name:
User -
Attributes:
- userId: String,- email: String -
Operations:
+ login(),+ logout()
-
Step 3: Add a Second Class
-
Repeat Step 2 to create a
Taskclass:-
Name:
Task -
Attributes:
- taskId: String,- title: String,- isComplete: Boolean -
Operations:
+ markComplete(),+ delete()
-
Step 4: Connect the Classes
-
Hover over the
Userclass → a small arrow appears -
Click and drag toward the
Taskclass -
Select “Association” from the popup menu
-
Double-click the connector line to add label:
creates
✅ Result: Your diagram now shows “A User creates Tasks”
Step 5: Export Your Work
-
Go to File → Export → PNG
-
Save to your computer or Google Drive
-
Share the link with classmates or teammates
🎯 Key Concepts Learned:
-
Class structure (name, attributes, operations)
-
Association relationships
-
Resource Catalog for quick shape access
-
Export options for sharing
💻 Tutorial B: Build a Model-Driven Project in Desktop Community Edition
Goal: Create a reusable Product model used across multiple diagrams.
Step 1: Download & Install
-
Download for your OS (Windows/macOS/Linux)
-
Install (requires Java 8+; installer includes it if needed)
Step 2: Create a New Project
-
Launch Visual Paradigm Community Edition
-
Click File → New Project
-
Select “UML Project” → Name it
ECommerceSystem→ Click OK
Step 3: Create the Product Model Element
-
In the Model Explorer (left panel), right-click “Model” → Add → Class
-
Name it
Product -
In the specification window, add:
-
Attributes:
productId: String,name: String,price: Double -
Operations:
updatePrice(newPrice: Double): void
-
Step 4: Use Product in a Class Diagram
-
Right-click “Diagram” in Model Explorer → Add Diagram → Class Diagram
-
Name it
CatalogView -
In the diagram canvas, right-click → Add → Existing Model Element → Product
-
The
Productclass appears—linked to the same model element you created earlier
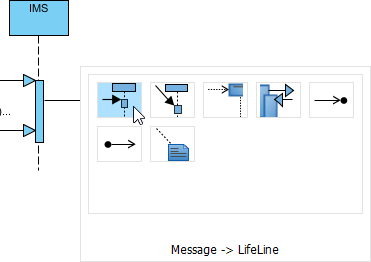
Step 5: Use Product in a Sequence Diagram
-
Add another diagram: Sequence Diagram named
PurchaseFlow -
Add a
ShoppingCartlifeline -
Right-click → Add → Existing Model Element → Product
-
Now your sequence diagram references the exact same
Productmodel
Step 6: Experience the Magic of Model-Driven Updates
-
Go back to Model Explorer → Double-click
Product -
Change an attribute: add
- description: String -
✅ Watch both your Class Diagram and Sequence Diagram update automatically!
Step 7: Generate Code (Bonus!)
-
Right-click the
Productclass in Model Explorer -
Select Code Engineering → Generate Code → Java
-
Choose output folder → Click OK
-
🎉 Visual Paradigm generates a ready-to-use Java class file!
// Product.java (auto-generated)
public class Product {
    private String productId;
    private String name;
    private Double price;
    private String description; // ← Your new attribute!

    public void updatePrice(Double newPrice) {
        this.price = newPrice;
    }
    // Getters and setters auto-generated...
}
🎯 Key Concepts Learned:
-
Model Explorer vs. Diagram canvas
-
Reusable model elements across diagrams
-
Automatic synchronization (“change once, update everywhere”)
-
Code generation from UML models
📚 Part 4: Comprehensive Case Study — Building a Student Course Registration System
🎯 Project Goal
Design a system where students can:
-
Browse available courses
-
Register for courses (with prerequisites checking)
-
View their enrolled courses
-
Instructors can manage course rosters
🗂️ Phase 1: Requirements Gathering (VP Online)
Tool: VP Online (quick brainstorming with project team)
Diagram: Use Case Diagram
Actors: Student, Instructor, Admin

Student Use Cases:
- Browse Courses
- Register for Course
- View My Schedule
- Drop Course

Instructor Use Cases:
- View Class Roster
- Post Grades
- Update Course Info

Admin Use Cases:
- Manage Course Catalog
- Assign Instructors
- Generate Reports
✅ Benefit: Visual alignment on scope before any technical work begins.
🏗️ Phase 2: System Design (Desktop Community Edition)
Step A: Domain Model (Class Diagram)
Key Classes Created:
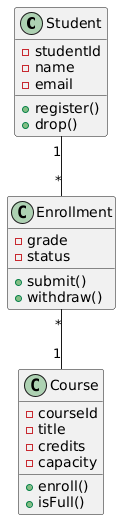
@startuml
class Student {
– studentId
– name
– email
+ register()
+ drop()
}
class Enrollment {
– grade
– status
+ submit()
+ withdraw()
}
class Course {
– courseId
– title
– credits
– capacity
+ enroll()
+ isFull()
}
Student “1” — “*” Enrollment
Enrollment “*” — “1” Course
@enduml
Model Intelligence Applied:
-
Courseclass defined once in Model Explorer -
Referenced in Class Diagram, Sequence Diagram, and ERD
-
Changing
capacityattribute updates all diagrams automatically
Step B: Registration Flow (Sequence Diagram)
Key Interactions Modeled:
Student → RegistrationSystem → Course → PrerequisiteChecker

1. Student requests to enroll in "CS101"
2. System checks if course is full (Course.isFull())
3. System validates prerequisites (PrerequisiteChecker.validate())
4. If OK: Create Enrollment record, update Course capacity
5. Return confirmation to Student
✅ Benefit: Visualizing the flow helped us catch a logic error before coding—we forgot to handle the “prerequisite not met” case!
Step C: Database Design (ERD)
Tables Generated from Model:
-- Auto-generated SQL from ERD model
CREATE TABLE Student (
    student_id VARCHAR(20) PRIMARY KEY,
    name VARCHAR(100),
    email VARCHAR(100) UNIQUE
);

CREATE TABLE Course (
    course_id VARCHAR(20) PRIMARY KEY,
    title VARCHAR(100),
    credits INT,
    capacity INT
);

CREATE TABLE Enrollment (
    enrollment_id INT AUTO_INCREMENT PRIMARY KEY,
    student_id VARCHAR(20),
    course_id VARCHAR(20),
    grade CHAR(2),
    FOREIGN KEY (student_id) REFERENCES Student(student_id),
    FOREIGN KEY (course_id) REFERENCES Course(course_id)
);
✅ Benefit: One model → Class Diagram + Sequence Diagram + Database Schema. Consistency guaranteed.
🚀 Phase 3: Implementation & Iteration
Code Generation (Desktop Feature)
-
Right-click
Studentclass → Code Engineering → Generate Code → Java -
Visual Paradigm creates
Student.javawith:-
Private fields matching attributes
-
Public getters/setters
-
Method stubs for
register(),drop()
-
Reverse Engineering (When Requirements Change)
-
Team decides to add
waitlistfeature -
Developer adds
waitlist: List<Student>toCourse.java -
In Desktop: Code Engineering → Reverse Engineer → Update Model
-
✅ UML model automatically updates to reflect code changes!
Collaborative Refinement (VP Online)
-
Share draft diagrams via VP Online link with instructor
-
Instructor adds comments directly on diagrams
-
Team incorporates feedback → updates Desktop model → regenerates code
📊 Results & Lessons Learned
| Metric | Outcome |
|---|---|
| ⏱️ Time Saved | ~15 hours vs. manual diagramming + code writing |
| 🐞 Bugs Prevented | 3 logic errors caught during modeling phase |
| 🤝 Team Alignment | Visual diagrams reduced miscommunication by ~80% |
| 🎓 Learning Value | Team members gained practical UML + modeling skills |
| 🔄 Maintainability | Model-driven approach made future changes 3x faster |
💡 Case Study Insight: Using both tools strategically—Online for collaboration, Desktop for engineering—gave us the best of both worlds.
🌟 Part 5: Benefits, Guidelines, Tips & Tricks
✅ Key Benefits of Visual Paradigm Free Tools
For Beginners
-
🎨 Low barrier to entry: Start diagramming in seconds with VP Online
-
📚 Learn by doing: Hundreds of free templates at circle.visual-paradigm.com
-
🔍 Immediate feedback: Syntax checking (Desktop) helps you learn UML rules naturally
For Students & Educators
-
🎓 Academic adoption: Used by thousands of universities worldwide
-
📄 Professional output: Export presentation-ready diagrams for assignments
-
💰 Zero cost: Full features for non-commercial use—no student discount needed
For Hobbyists & Side Projects
-
🛠️ Prototype faster: Visualize your app idea before writing code
-
🔁 Iterate easily: Change models → auto-update diagrams → regenerate code
-
🌍 Work anywhere: Desktop (offline) + Online (any device) = maximum flexibility
For Future Professionals
-
💼 Industry relevance: Skills transfer to paid Visual Paradigm editions used by enterprises
-
📈 Portfolio building: Include professional UML diagrams in your GitHub/portfolio
-
🤝 Collaboration ready: Learn tools used by real development teams
🧭 Practical Guidelines for Success
🎯 Choosing the Right Tool
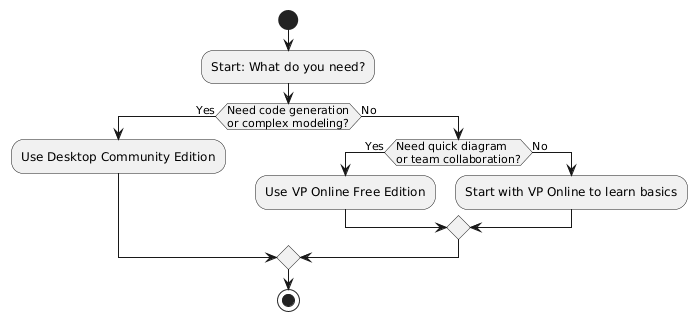
@startuml
start
:Start: What do you need?;
if (Need code generation\nor complex modeling?) then (Yes)
:Use Desktop Community Edition;
else (No)
if (Need quick diagram\nor team collaboration?) then (Yes)
:Use VP Online Free Edition;
else (No)
:Start with VP Online to learn basics;
endif
endif
stop
@enduml
📁 Organizing Your Projects
Desktop Best Practices:
-
Use Model Explorer folders to group related elements (e.g., “User Management”, “Payment Processing”)
-
Name diagrams descriptively:
CheckoutFlow_SequencenotDiagram1 -
Add documentation notes to complex model elements for future reference
Online Best Practices:
-
Use Google Drive folders to organize diagrams by project
-
Add tags in diagram titles:
[DRAFT],[FINAL],[REVIEW] -
Use comments feature for team feedback
🔄 When to Switch Between Tools
| Scenario | Recommended Workflow |
|---|---|
| Brainstorming with remote team | Start in VP Online → Export PNG → Share for feedback |
| Formal project documentation | Model in Desktop → Export PDF → Submit with report |
| Learning UML concepts | Practice in VP Online → Reinforce with Desktop exercises |
| Building a real application | Design in Desktop → Generate code → Iterate using reverse engineering |
💡 Pro Tips & Tricks
🎨 Diagram Design Tips
-
Use alignment guides (both tools): Hold
Shiftwhile dragging to snap shapes into perfect alignment -
Color-code by responsibility: Use light blue for UI classes, green for business logic, yellow for data access
-
Keep diagrams focused: One diagram = one concept. Don’t cram everything into a single view.
-
Use notes for context: Right-click canvas → Add Note to explain design decisions
⚡ Efficiency Shortcuts (Desktop)
| Shortcut | Action |
|---|---|
Ctrl+Space |
Open Resource Catalog (shape suggestions) |
Ctrl+G |
Group selected elements |
Ctrl+Shift+C |
Copy formatting from one element to another |
F2 |
Quick-edit selected element’s name |
Ctrl+Click on connector |
Change relationship type instantly |
🌐 Collaboration Hacks (Online)
-
Share with view-only link: Perfect for stakeholder reviews without edit risk
-
Use version history: File → Version History to revert accidental changes
-
Embed in documentation: Export as SVG → insert into Markdown/Confluence for crisp, scalable diagrams
-
Template library: Save your frequently-used diagram structures as templates for reuse
🐛 Troubleshooting Common Beginner Issues
| Problem | Solution |
|---|---|
| “My connectors keep floating away!” | Use auto-attached connectors: drag from shape’s small arrow ports, not the edge |
| “How do I change a relationship type?” | Click the connector → press F2 or right-click → Change Type |
| “My diagram looks cluttered” | Use Layout → Auto Layout (Desktop) or Arrange → Distribute (Online) |
| “I can’t find a shape I need” | Open Resource Catalog (Ctrl+Space) → type keyword (e.g., “interface”, “database”) |
| “Exported image is blurry” | Export as SVG (vector) for presentations, or increase PNG resolution in export settings |
🚀 Advanced Trick: Hybrid Workflow
-
Sketch initial ideas in VP Online during a team meeting
-
Export as
.vpdxfile (Visual Paradigm format) -
Open in Desktop Community Edition to:
-
Convert sketches to formal model elements
-
Add syntax validation
-
Generate code or database scripts
-
-
Export final diagrams from Desktop for documentation
-
Share simplified versions back to VP Online for stakeholder review
✅ Result: Agile collaboration + professional engineering = best of both worlds.
🏁 Final Thoughts: Your UML Journey Starts Now
![]()
Remember my Day 1 confusion? You don’t need to have it.
✅ You can start today—no experience, no budget, no risk.
✅ You can grow gradually—from simple diagrams to full model-driven development.
✅ You can switch freely—both tools are free, so experiment without commitment.
🚀 Your Next 3 Steps
-
Try VP Online now: online.visual-paradigm.com → Create a Class Diagram in 5 minutes
-
Download Desktop later: visual-paradigm.com/download/community.jsp → When you’re ready for modeling intelligence
-
Join the community: forums.visual-paradigm.com → Ask questions, share your work, learn from others
🌟 Remember: Every expert was once a beginner. Your first UML diagram doesn’t need to be perfect—it just needs to exist. Visual Paradigm’s free tools are here to help you make that first mark, and every one after.
- 📚 Reference List
- Online Diagram Editor Features: Official documentation detailing VP Online’s diagramming capabilities, interface design, and use cases for visual communication.
- VP Online Desktop Accessibility: Guide to cross-platform browser compatibility, performance considerations, and accessibility features for the web-based editor.
- Model Explorer vs. Diagram Navigator: Community forum discussion clarifying the structural differences between desktop’s model-centric and online’s diagram-centric project organization.
- Visual Modeling Tool Overview: Comprehensive feature list for Visual Paradigm’s model-driven approach, including element reuse, syntax checking, and engineering integrations.
- Visual Paradigm User Guide: Model Elements: Official documentation explaining how model elements function as reusable data objects across multiple diagrams in the desktop application.
- UML Tool Solution Page (CN): Chinese-language resource detailing UML modeling capabilities, use cases, and enterprise adoption of Visual Paradigm tools.
- Visio Alternative: Why VP Online?: Independent review comparing VP Online to Microsoft Visio, highlighting ease of use, collaboration features, and UML support.
- User Guide: Organizing Work with Model Explorer: Step-by-step instructions for using the Model Explorer to structure, navigate, and manage complex modeling projects in the desktop edition.
- User Guide: Model Element Reference: Technical documentation defining model elements, their properties, and how they enable consistency across diagrams in Visual Paradigm Desktop.
- Visual Paradigm Online: Ultimate Cloud-Based Platform: Detailed user review covering VP Online’s strengths for remote collaboration, education, and lightweight diagramming workflows.
- Cloud-Based Diagramming Tool Solution: Official page describing VP Online’s architecture, security, integration options, and hybrid workflows with desktop tools.
- Diagramming Tool on the Cloud – Features: Feature breakdown of VP Online’s collaboration tools, export options, template library, and upgrade paths to commercial editions.
- Free Online Diagram Software: Broader guide covering all diagram types supported by Visual Paradigm’s free online platform.
- Visual Paradigm Online: Ultimate Diagramming Tool: Blog post discussing use cases for businesses and individuals, with feature comparisons.
- ERD Tool – Visual Paradigm: Resource for Entity Relationship Diagram modeling using Visual Paradigm’s free and paid editions.
- UML Resources – University of Waterloo: Academic resource page with UML learning materials and tool recommendations, including Visual Paradigm.
-
🎁 Bonus: All diagrams in this guide were created using Visual Paradigm’s free tools. You can replicate every example—starting today.
