


📘 New Introduction: Why This Guide Exists
If you’re reading this, you’re probably one of three people: a junior developer curious about UML, a team lead exploring ways to speed up design workflows, or a non-technical stakeholder trying to understand how modern tools bridge the gap between ideas and code. Whoever you are, welcome.
I’m a software engineer who has spent years wrestling with UML tools—some clunky, some powerful, all demanding. When I first heard about an AI-assisted UML class diagram generator, I was skeptical. Could an AI really understand the nuance of object-oriented design? Would it help beginners without oversimplifying complex concepts? After putting the tool through its paces on a real-world library management system project, I’m ready to share what I learned—not as a vendor, but as a practitioner who values clarity, collaboration, and clean architecture.
This guide is written for you: the IT professional or student taking your first steps into system modeling. We’ll walk through key concepts, practical guidelines, and field-tested tips—no jargon without explanation, no assumptions about prior expertise. And yes, we’ll keep the images from the original case study so you can see exactly what each step looks like in action.
Let’s build something great, together.
🎯 Key Concepts Every Beginner Should Know
What Is a UML Class Diagram, Really?
Think of a UML class diagram as the architectural blueprint for your software. Just as a building blueprint shows walls, doors, and electrical layouts, a class diagram shows:
-
Classes: The core “things” in your system (e.g.,
Book,LibraryMember) -
Attributes: The data each class holds (e.g.,
isbn: String,memberId: String) -
Operations: The actions each class can perform (e.g.,
checkOutBook(),calculateFine()) -
Relationships: How classes connect (inheritance, association, composition)

Why AI Assistance Changes the Game
Traditional UML tools require you to manually draw every box and line. AI-assisted tools flip the script: you describe what you need in plain language, and the AI proposes a structured model. But—and this is critical—the human stays in the loop. The AI suggests; you decide. This partnership accelerates the tedious parts while preserving your architectural judgment.
The 3 Golden Rules for AI-Assisted Modeling
-
Start with clear intent: Vague prompts yield vague models. Be specific about scope and boundaries.
-
Review, don’t just accept: AI is a powerful intern, not a replacement for your expertise.
-
Document as you go: Use notes and comments to capture why decisions were made—future you will thank present you.
🛠️ The 10-Step Workflow: A Beginner-Friendly Walkthrough
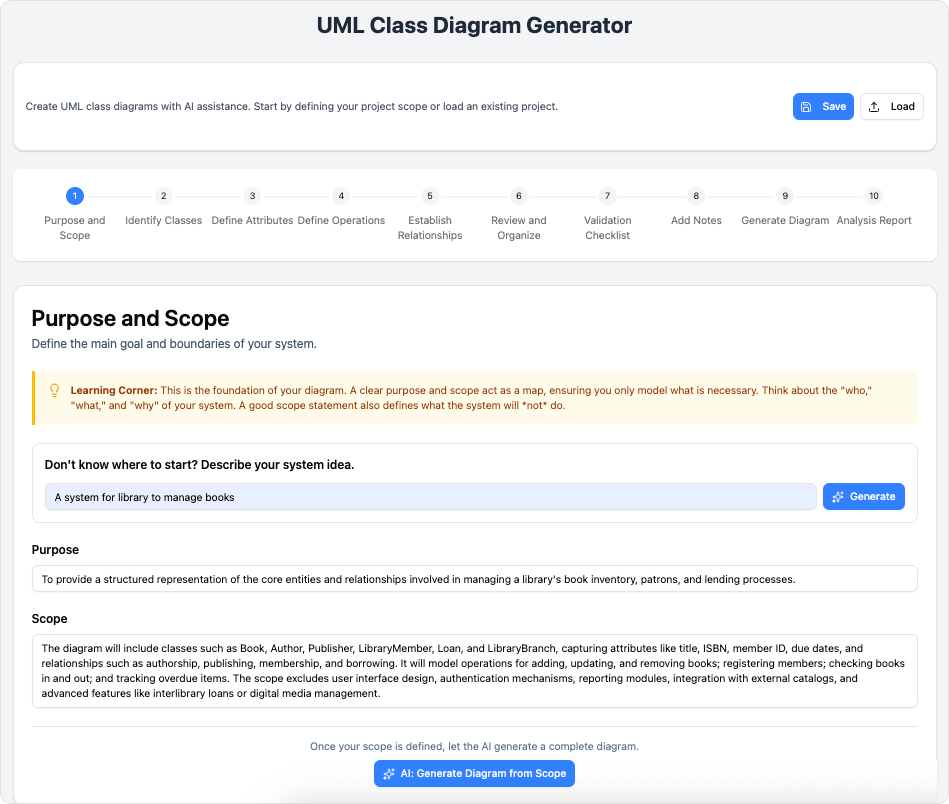
Step 1: Purpose and Scope — Set Your Foundations Right
What happens: You enter a natural language description of your system. The AI extracts core purpose and defines explicit inclusions/exclusions.
Beginner tip: Don’t just say “a library system.” Try: “A multi-branch digital library where members borrow books, return them, and incur fines for late returns—excluding payment processing and mobile app UI.”
Why it matters: Clear scope prevents feature creep before you even start designing.
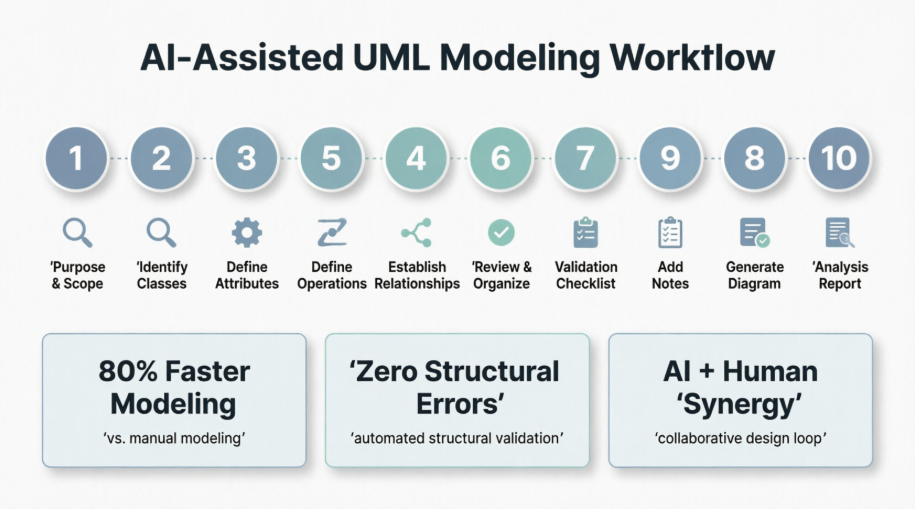
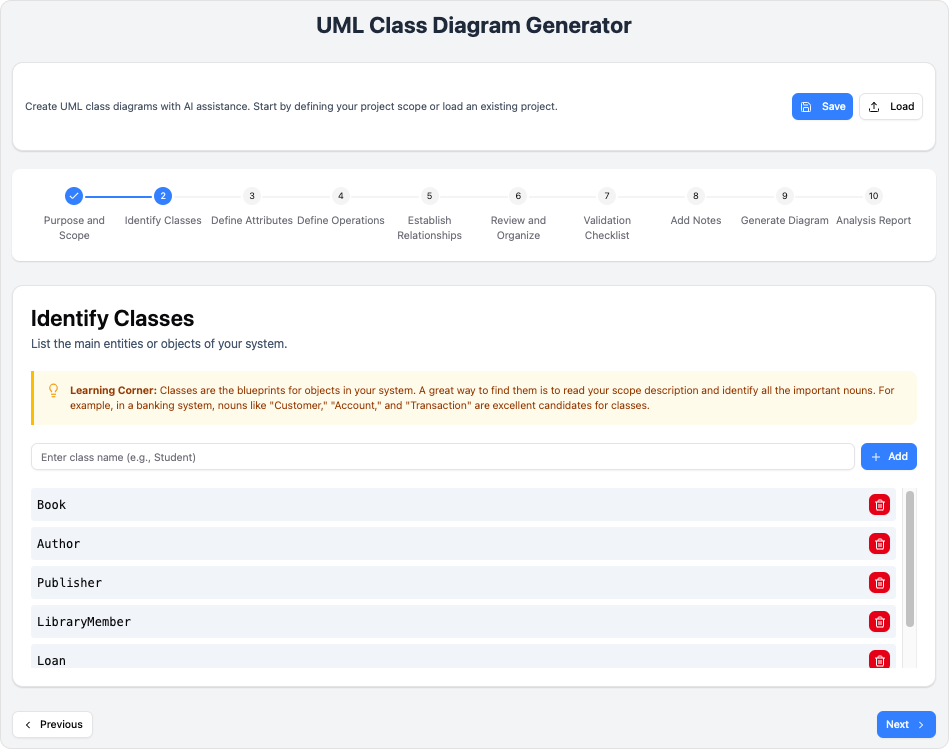
Step 2: Identify Classes — Let AI Suggest, You Refine
What happens: The AI scans your scoped description and proposes a starter list of classes.
Beginner tip: Rename generic terms for domain clarity. Change User to LibraryMember. Merge redundant suggestions like CatalogEntry into Book if they represent the same concept.
Pro move: Add compliance-focused classes early (e.g., FinePolicy) if your domain has regulatory requirements.
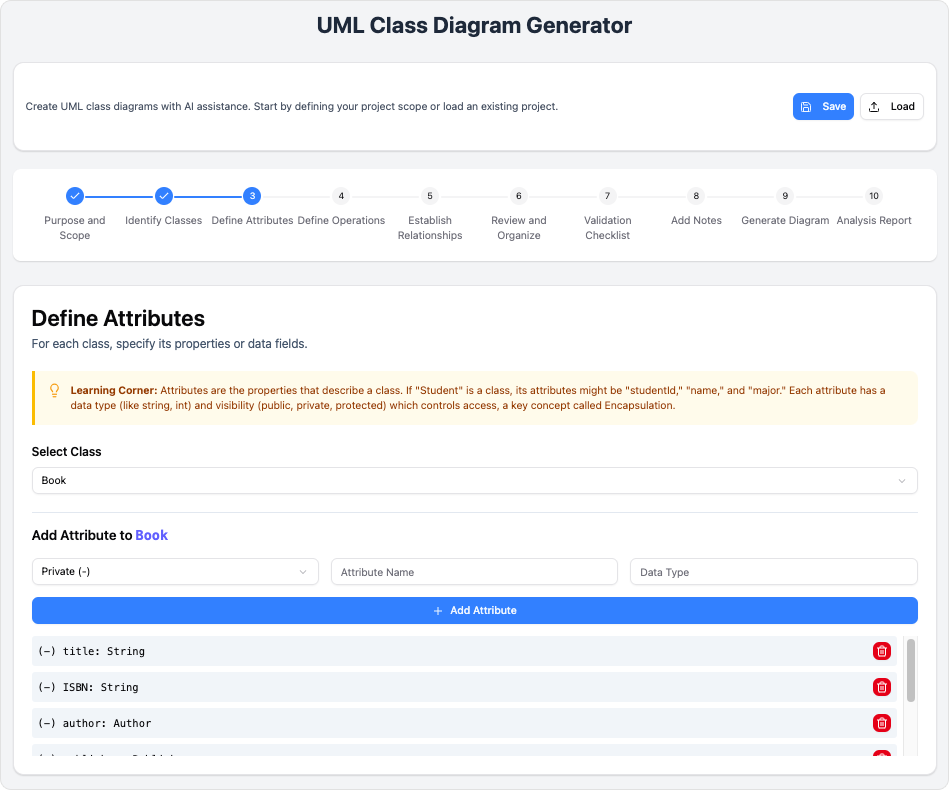
Step 3: Define Attributes — Data Types and Visibility Matter
What happens: AI suggests attributes with appropriate visibility (+ public, - private, # protected) and data types.
Beginner tip: Start simple. Add complexity only when needed. For example, begin with - title: String before adding - edition: Integer.
Watch out: Ensure attribute names align with your database schema to avoid refactoring later.
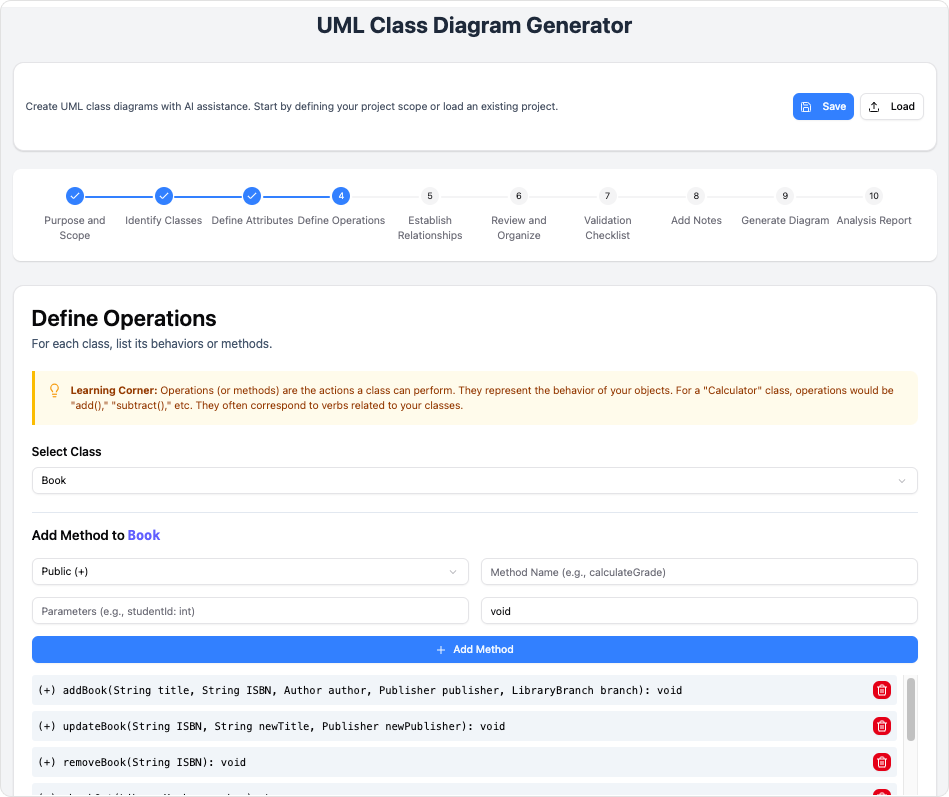
Step 4: Define Operations — Translate Behavior into Methods
What happens: Behavioral requirements become class methods with parameters and return types.
Beginner tip: Use clear, verb-first naming: + checkOutBook(memberId: String): Loan is more intuitive than + process(memberId).
Team tip: Align return types with your organization’s error-handling patterns early (e.g., return Result<Loan> instead of just Loan if you use result wrappers).
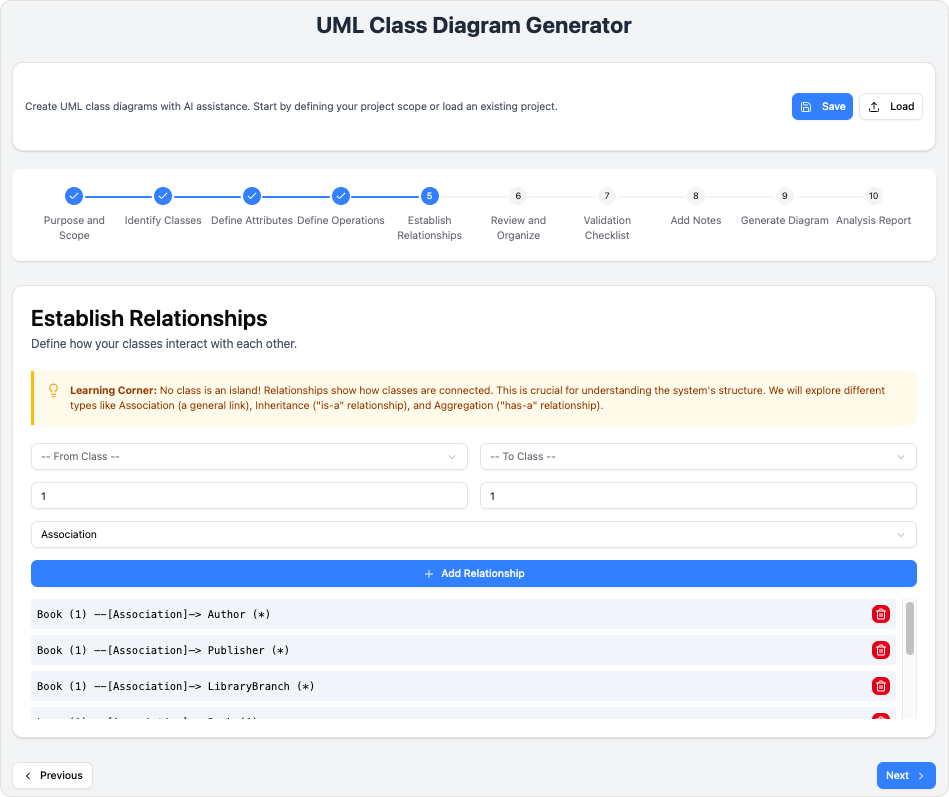
Step 5: Establish Relationships — Map Connections with Precision
What happens: AI maps associations, multiplicities, inheritance, composition, and aggregation.
Beginner cheat sheet:
-
1= exactly one -
0..*= zero or many -
1..*= one or many -
Composition (filled diamond) = lifecycle dependency (if parent dies, child dies)
-
Aggregation (hollow diamond) = shared ownership
Critical check: Verify no circular dependencies exist. If A depends on B and B depends on A, reconsider your design.
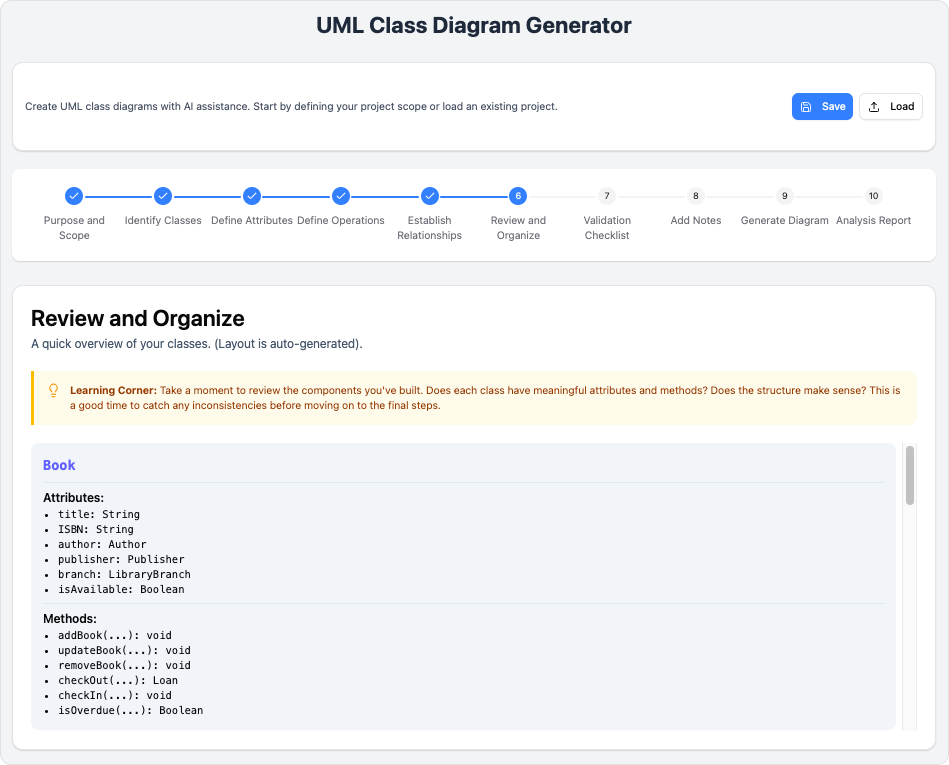
Step 6: Review and Organize — Clarity Through Layout
What happens: AI optimizes visual layout, clusters related classes, and flags isolated entities.
Beginner tip: Group classes by domain module (e.g., “Transaction Module”: Loan, ReturnPolicy, FinePolicy). This makes the diagram easier to discuss with non-technical stakeholders.
Pro move: Use color coding or packages to visually separate core domain logic from infrastructure concerns.
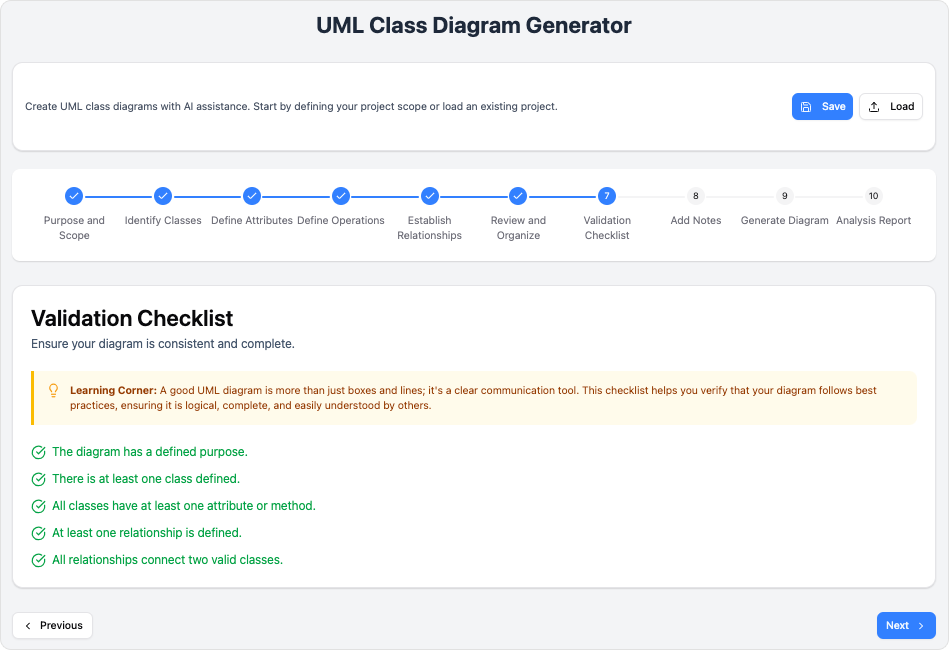
Step 7: Validation Checklist — Catch Errors Before Code
What happens: An automated QA engine checks UML syntax and OOP best practices.
Common flags for beginners:
-
Missing visibility modifiers
-
Inconsistent naming conventions (e.g.,
fineCalculatorvsFineCalculator) -
Overly complex methods that should be extracted
Team tip: Treat validation errors as learning opportunities. Each correction reinforces good design habits.
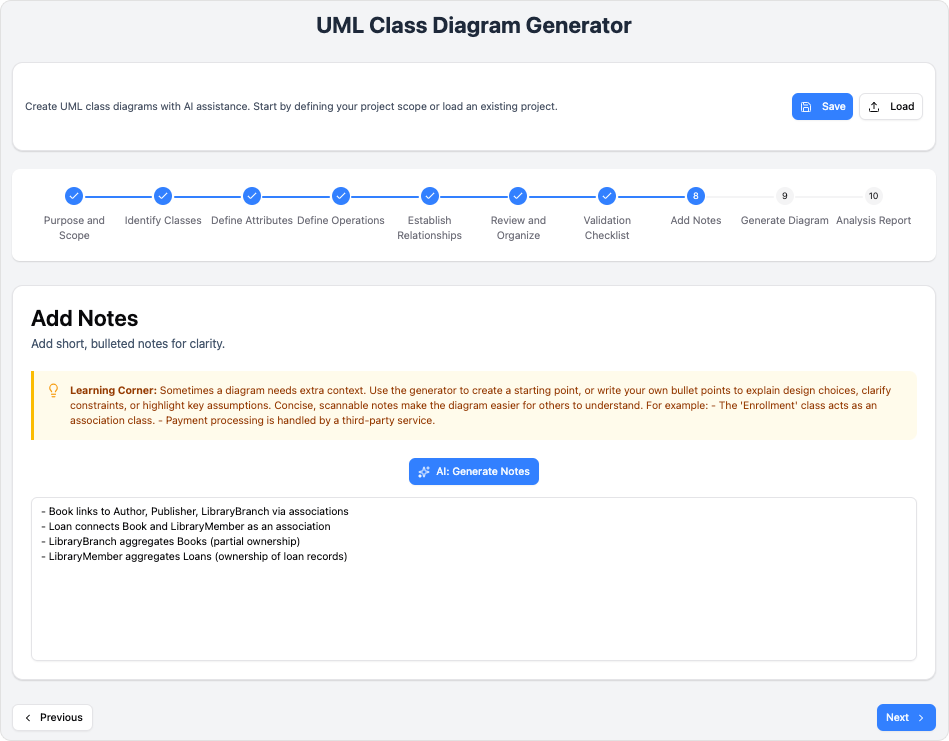
Step 8: Add Notes — Turn Diagrams into Living Documentation
What happens: Append contextual UML notes directly to classes or relationships.
Beginner example:
note top of Loan: "Uses Strategy Pattern for regional fine calculations"
note left of PremiumMember: "Overrides base checkout limit; requires GDPR audit logging"
Why this rocks: These notes travel with the diagram, making onboarding new team members faster and preserving architectural rationale.
Step 9: Generate Diagram — From Configuration to Visual Artifact
What happens: Validated configuration compiles into clean PlantUML syntax and renders a professional visual diagram.
Beginner tip: Export as SVG for presentations (scalable, crisp) and as raw markup for version control.
Team workflow: Store the PlantUML source in your repo alongside code—diagrams stay in sync with implementation.
Step 10: Analysis Report — Learn from Structural Insights
What happens: AI generates a structural assessment covering cohesion, coupling, and potential bottlenecks.
Beginner takeaway: Don’t skip this report. Even if you don’t act on every suggestion, it trains your eye for design quality.
Example insight: “High cohesion in Book class” = good. “Potential N+1 query risk in Member ── Loan traversal” = flag for database optimization later.
💡 Practical Tips for Beginners and Teams
For Individual Learners
-
Start small: Model a single feature (e.g., “book checkout”) before tackling the whole system.
-
Use the AI as a tutor: When it suggests a relationship you don’t understand, ask it to explain the UML semantics.
-
Keep a design journal: Note why you accepted or rejected AI suggestions—this builds your architectural intuition.
For Development Teams
-
Establish naming conventions early: Agree on attribute/method naming styles before Step 3 to avoid rework.
-
Use Save/Load strategically: Save checkpoints after Steps 1, 5, and 7 to enable parallel exploration of design alternatives.
-
Review diagrams in stakeholder sessions: The visual clarity of AI-generated diagrams makes them perfect for aligning technical and non-technical team members.
For Engineering Leaders
-
Measure what matters: Track time-to-initial-diagram and post-generation validation errors to quantify ROI.
-
Invest in note-taking culture: Encourage teams to use Step 8 notes to capture architectural decisions—this becomes invaluable for future refactoring.
-
Plan for evolution: Use the Analysis Report (Step 10) to inform sprint planning and technical debt prioritization.
📊 What to Expect: Realistic Outcomes
Based on hands-on experience and the EduLib Systems case study, here’s what teams typically see after adopting this workflow:
| Metric | Traditional Approach | With AI-Assisted Tool |
|---|---|---|
| Time to Initial Diagram | 18–22 hours | 3–4 hours |
| Validation Errors Post-Generation | 12–15 per iteration | 0–2 (often auto-corrected) |
| Stakeholder Alignment Rounds | 4+ sessions | 1 final review |
| Design Pattern Guidance | Manual research | AI-suggested & documented |
The human impact matters most:
-
Junior developers gain confidence faster with guided, validated suggestions
-
Senior architects spend less time on syntax and more on strategic trade-offs
-
Cross-functional teams align quicker because diagrams are clear, consistent, and annotated
🏁 New Conclusion: Your Next Step in Architectural Mastery
If you’ve made it this far, you now have something valuable: a realistic, beginner-friendly roadmap for leveraging AI in UML modeling. The key insight isn’t that AI replaces human judgment—it’s that AI amplifies it. By handling the repetitive, syntax-heavy aspects of diagram creation, these tools free you to focus on what truly matters: designing systems that are resilient, maintainable, and aligned with business goals.
For beginners: Don’t be intimidated by UML’s formal notation. Start with a simple prompt, let the AI propose a structure, and iteratively refine. Every expert was once a beginner who kept going.
For teams: Adopt this workflow incrementally. Try it on a low-risk feature first. Measure the time saved and errors prevented. Share the wins. Momentum builds quickly when people see tangible benefits.
The future of software design isn’t human versus AI—it’s human with AI. Tools like the AI-Assisted UML Class Diagram Generator represent a shift toward collaborative intelligence, where technology handles the mechanics and humans provide the vision. As you embark on your next modeling project, remember: precision isn’t about perfection on the first try. It’s about creating a structured, repeatable process where every iteration brings you closer to architectural excellence.
Your blueprint awaits. Start drawing.
